Side Dishes
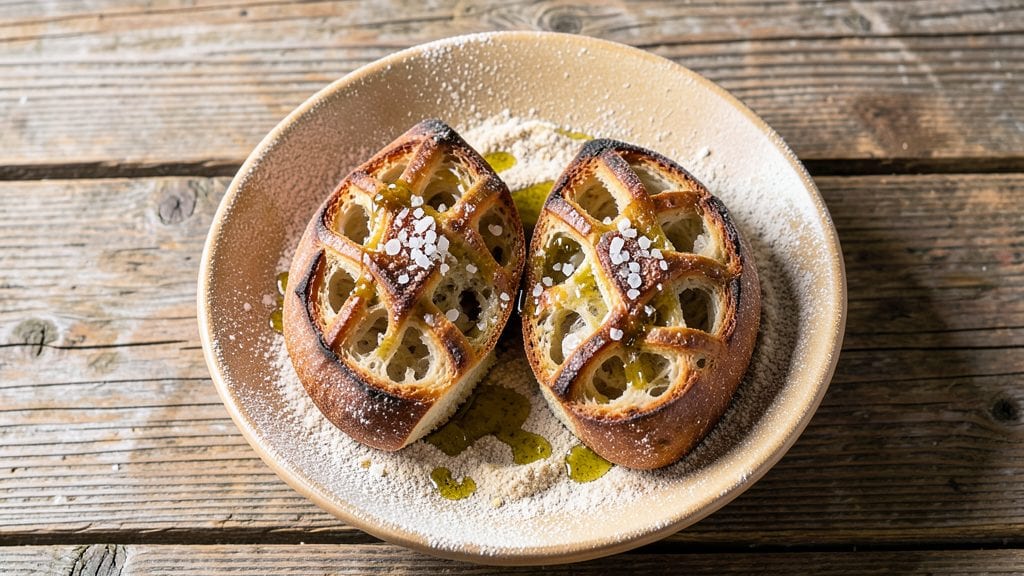
This Angelo's bread recipe delivers the same artisanal quality you'd find in a traditional Italian bakery—crusty on the outside, chewy inside, and with that signature golden-brown crust. The no-knead method transforms what used to be a labor-intensive process into something achievable with minimal effort.
After years of perfecting my own version, I've finally cracked the code for that elusive combination of texture and flavor that makes this bread so beloved.
The secret lies in a slow fermentation process that develops deep flavor and a light, airy crumb without requiring any kneading. You'll work with just five simple ingredients—flour, water, yeast, salt, and olive oil—yet the result is a loaf that rivals anything you'd buy from a specialty bakery.
The dough rests overnight, allowing the gluten to relax and the flavors to meld, which is what gives this bread its signature chewiness and crusty exterior.
By the time you pull it from the oven, you'll have a loaf with a crisp, shatteringly thin crust that gives way to a soft, open crumb inside.
The aroma alone will make your kitchen smell like an Italian bakery, and the taste is even better—slightly tangy, with just the right amount of saltiness from the olive oil. This bread is perfect for serving alongside soups, pairing with charcuterie, or simply enjoying with butter straight from the oven.
Whether you're baking for a family dinner or preparing for a holiday feast, this recipe scales beautifully and delivers consistent results every time. The beauty of the no-knead method is that it's forgiving—no need to stress over perfecting a complicated technique. Let's get started on creating your own Italian masterpiece.
Ingredients for angelo's bread
Five simple ingredients transform into crusty, chewy bread with minimal effort.
| Ingredient | Amount | Notes |
|---|---|---|
| All-Purpose Flour 🌾 | 4 cups | Unbleached preferred for texture |
| Water 💧 | 2 ½ cups | Room temperature for best rise |
| Active Dry Yeast 🍞 | ¼ tsp | Fresh yeast preferred if available |
| Extra-Virgin Olive Oil 🫒 | 2 tbsp | High quality for richness |
| Sea Salt 🧂 | 1 ½ tsp | Fine grain preferred |
| Cornmeal 🌽 | ¼ cup | For dusting baking sheet |
| Ice Water ❄️ | ½ cup | For shaping dough |
The flour is where the magic happens. King Arthur or Caputo Tipo 00 make all the difference—Caputo gives that perfect Italian texture, but King Arthur works in a pinch. If you're using all-purpose, sift it first to avoid lumps. The yeast? Fresh yeast from the refrigerated section is worth the splurge for this recipe. It activates faster and gives a better rise. Store-bought dry yeast works too, but make sure it's not expired—yeast loses potency fast. The olive oil should be extra-virgin—the good stuff with a peppery kick. None of that cheap cooking oil nonsense.
No extra-virgin olive oil? Light olive oil at half the amount gets you close, but you'll miss that fruity depth. Running short on yeast? Instant yeast works 1:1, but active dry needs a 5-minute soak in warm water. The cornmeal is non-negotiable for the baking sheet—it prevents sticking and gives that classic bread base. If you're gluten-free, Bob's Red Mill 1:1 flour works surprisingly well, but expect a slightly denser crumb. The ice water is key for shaping—it chills the dough just enough to handle without sticking.
This dough is a patient recipe. Let it ferment 12-18 hours at room temp for best flavor. Shape it into a round boule or batard—no fancy techniques needed. The crust develops best when baked at 450°F for 30 minutes. Store wrapped in a towel for 3 days or freeze for 3 months. I always make two batches—one for the week, one to freeze. The aroma alone makes the wait worth it.
Why You'll Love This Recipe
- No-Knead Magic: I swear, the only "work" here is mixing flour, water, and yeast—no stand mixer, no arm workout. That olive oil? It keeps every bite tender without needing butter, and the salt? Just enough to make it actually taste like bread, not cardboard.
- Olive Oil Luxe: Between us, this isn’t your basic store-bought loaf. The extra-virgin olive oil gives it a subtle richness that turns plain toast into a little treat—no fancy ingredients, just that one upgrade that makes it feel special.
- Weeknight Swiss Army: Toss it in a pan for garlic toast, tear it over salads, or freeze slices for quick mornings. Honestly, I’ve used it for everything from sandwiches to dipping in soup, and it never lets me down—even when I’m too tired to think.
- Budget Hero: Five ingredients, zero waste. That flour and yeast combo stretches farther than you’d think, and the olive oil? A little goes a long way. I’ve made three loaves from one batch, and my wallet’s still breathing easy.
Step-by-step instructions for Angelo's bread
This no-knead method delivers authentic Italian bread with a crispy crust and chewy interior—every time.
Combine Wet Ingredients and Yeast
In a large mixing bowl, combine the 2.5 cups water with the 0.25 tsp active dry yeast. Stir gently to dissolve the yeast completely—you should see small bubbles forming within 5 minutes. This activates the yeast and ensures proper fermentation later.
Next, add the 2 tbsp extra-virgin olive oil and 1.5 tsp sea salt. Whisk everything together until the salt fully dissolves and the mixture looks like a pale, slightly oily liquid. The oil helps create that signature chewy texture, while the salt controls yeast activity for balanced flavor.
Mix in the Flour and Rest
Gradually add the 4 cups all-purpose flour to the wet mixture, stirring with a wooden spoon or your hands until a shaggy dough forms. It'll look sticky and uneven at first—that's normal. Once combined, cover the bowl with a damp kitchen towel and let it rest for 1 hour at room temperature.
During this time, the flour absorbs the liquid and gluten begins to develop. You'll notice the dough becomes smoother and more cohesive. This resting period is crucial—it prevents overworking the dough later and helps create that perfect open crumb structure.
Shape the Dough and Prepare for Baking
Lightly dust a clean surface with 0.25 cup cornmeal and turn out the rested dough. Gently shape it into a round loaf by folding the edges toward the center, creating surface tension. The cornmeal prevents sticking and adds a subtle flavor. Place the shaped dough on a parchment-lined baking sheet.
Cover the dough loosely with the damp towel again and let it rise for another 1 hour. You'll know it's ready when it's puffed about 50% and springs back slowly when gently pressed. The ice water from the ingredients list isn't used here—it's reserved for shaping if needed, but this dough should be manageable by hand.
Preheat and Bake for Maximum Crust
Preheat your oven to 425°F with a baking stone or inverted baking sheet on the middle rack. This creates steam when the dough goes in, which is essential for that crackly crust. Once preheated, score the top of the dough with a sharp razor or knife in a crosshatch pattern—this controls expansion and creates those beautiful air pockets.
Bake for 25-30 minutes until the bread is deep golden brown and sounds hollow when tapped on the bottom. The interior should register 190-200°F on an instant-read thermometer. Don't open the oven during baking—this releases steam and prevents proper crust formation.
Cool and Enjoy
Remove the bread from the oven and transfer it to a wire rack. Let it cool completely for at least 1 hour before slicing. This resting period allows the crumb to set and prevents a gummy texture. The bread will be warm to the touch but firm enough to handle.
Slice into thick pieces for that classic Italian bread experience. You'll notice the exterior has a crispy, almost crackly crust that gives way to a soft, chewy interior with an open crumb structure. Store any leftovers wrapped in a clean kitchen towel to maintain freshness for up to 3 days.>
Pro Tips For Making Angelo'S Bread
- Bloom the Yeast First: Skip mixing yeast directly into flour—it dies faster. Instead, proof it in warm water (110°F) with a pinch of sugar for 5–10 minutes until frothy. This guarantees your dough rises reliably, especially in cooler kitchens.
- Use Lukewarm Water: Yeast hates extremes. Test your water with your finger—it should feel like bathwater, not scalding or tepid. Too hot kills it; too cold makes it sluggish. I learned this the hard way after doughs that took hours to rise.
- Knead Until Silky: Stop when the dough springs back slowly and leaves a clean window on your fingers. Over-kneading toughens it; under-kneading leaves it gummy. For Angelo’s bread, aim for 8–10 minutes by hand—no need to tire yourself out.
- Salt the Dough Last: Mix salt into the flour after activating the yeast. Salt slows yeast activity, so adding it early can weaken your rise. Toss it in with the final flour fold—your crust will thank you for the even distribution.
Troubleshooting great angelo's bread
Dough Too Sticky?
If your dough feels impossible to handle, don't panic—this is normal for no-knead bread. Wet your hands with ice water (from the ingredients list) and work quickly. The dough should release slightly when wet. For extra grip, use a damp kitchen towel between your hands while shaping.
If it still sticks, dust your work surface with more cornmeal or semolina flour—they work better than all-purpose flour for this purpose. 💫
Underproofed Dough
An underproofed loaf will be dense and heavy rather than light and airy. Check for doneness by gently pressing the dough—it should spring back slowly (not quickly) and feel puffy.
If it's still flat after 2 hours of rising, try these fixes: place the covered bowl in a warmer spot (like near the oven with the light on) or add 1 tsp sugar to the dough to feed the yeast. Never skip the resting periods—they're crucial for flavor development.
Pale Crust or Flat Top
A pale crust usually means insufficient steam during baking. For next time, try this: place a baking stone on the middle rack and preheat with a pan of boiling water on the lower rack for 15 minutes before baking.
Score the dough deeper (about ½ inch) to encourage oven spring. If your oven runs hot, reduce temperature to 400°F and bake for 35 minutes instead. For an instant fix, broil the loaf for 1-2 minutes at the end for color.
Dense Interior Texture
Overworking the dough or skipping fermentation are the most common causes. For future batches, handle the dough minimally during shaping—just enough to create surface tension. If you've already mixed it, let it rest 12-18 hours at room temperature before baking.
For immediate results, transfer the shaped dough to a proofing basket lined with a flour-dusted towel and let rise 2 more hours before baking. This extra time allows gluten to relax properly.
Yeast Issues
If your dough doesn't rise at all, your yeast may be dead. Always check the expiration date—yeast loses potency after 3-4 months even when refrigerated. For future batches, test your yeast first by mixing ¼ tsp yeast with ¼ cup warm water and 1 tsp sugar.
If it doesn't foam within 10 minutes, replace it. For expired yeast, try 1 tsp baking soda as a substitute (though results won't be identical). Keep yeast in the freezer for longer shelf life.
Bread Collapsed After Baking
This usually happens when the dough loses gas during baking. First, ensure your oven is fully preheated—cold spots cause uneven cooking. For next time, shape the dough into a tighter boule with more surface tension.
If it collapses after scoring, try this: place the baking sheet on the middle rack (not the top) where heat is more even. For immediate results, brush the baked loaf with melted butter and return to the oven at 350°F for 5 minutes to restore some structure.
Nutrition facts
Frequently asked questions
Can I use this recipe with bread flour instead of all-purpose?
The recipe works beautifully with bread flour for a slightly chewier texture. Just reduce the water by 1-2 tablespoons since bread flour absorbs more moisture. For best results, use Caputo Tipo 00 flour if available—it creates that perfect Italian-style crumb. The no-knead method still applies, but expect a denser crumb compared to all-purpose.
How do I know when the dough is ready to bake?
Your dough is ready when it's puffed about 50% and springs back slowly (not quickly) when gently pressed. The surface should look slightly domed, and you'll notice bubbles forming along the sides. If it's still flat after 2 hours of rising, try placing the bowl in a warmer spot (like near the oven with the light on) to encourage fermentation.
Can I make this bread without a baking stone?
For a crispy crust, place an inverted baking sheet on the middle rack while preheating. This creates steam when the dough goes in. Alternatively, use a heavy oven-safe skillet or even a pizza stone substitute (like a cast-iron pan). Just ensure your oven is fully preheated before adding the dough to maintain even heat distribution.
What’s the best way to reheat stale Angelo’s bread?
For that fresh-from-the-oven texture, wrap the bread in aluminum foil and heat at 350°F for 5-7 minutes. Avoid the microwave—it makes the crust soggy. For extra crispiness, brush the warmed loaf with melted butter and broil for 1-2 minutes on high. This works especially well for toast or sandwiches.
Why does my bread taste bland compared to store-bought?
Homemade bread often tastes bland because it lacks commercial additives like dough conditioners. Boost flavor by adding 1 tsp honey or sugar to the dough, or brush the baked loaf with olive oil and coarse sea salt before serving. For depth, try fermenting the dough 18-24 hours at room temperature—this develops more complex flavors naturally.