Main Courses
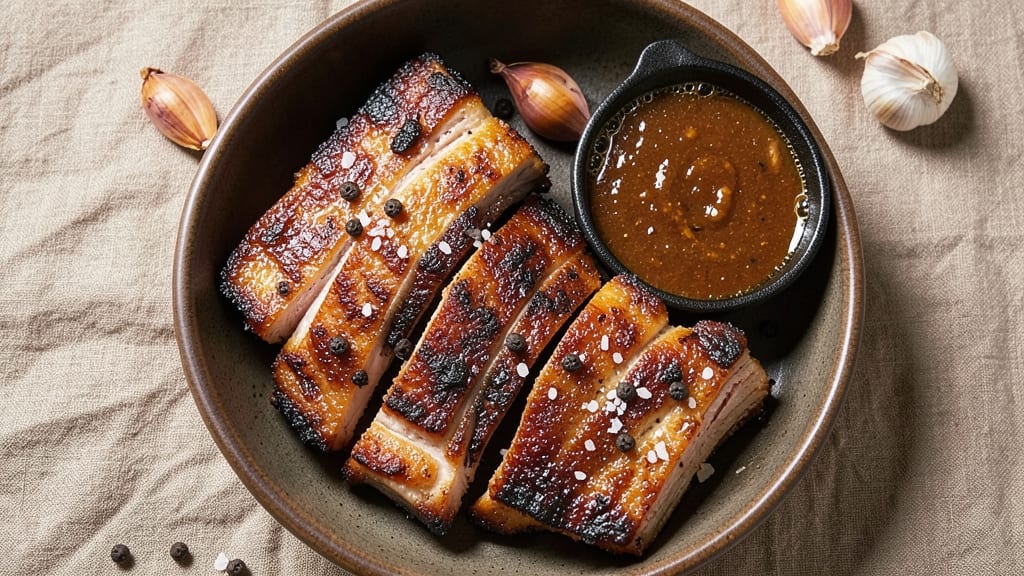
Mastering boil and bake ribs transforms tough cuts into melt-in-your-mouth perfection with minimal effort—just 3 hours of hands-off cooking. The secret lies in a two-step process: first boiling the ribs in seasoned water to tenderize, then baking them uncovered to develop a caramelized bark.
I perfected this method after years of experimenting, and it consistently delivers restaurant-quality results at home without a smoker or slow cooker.
The beauty of this technique is its simplicity and reliability. You’ll start with a basic brine of salt, sugar, and spices that infuses flavor while breaking down the collagen in the meat.
After boiling, the ribs transfer to the oven where high heat concentrates those flavors into a glossy, sticky crust that locks in moisture. This method works equally well with pork ribs or beef short ribs, making it versatile for any occasion.
What you’ll end up with is ribs that fall apart at the slightest touch, with a deep mahogany crust and juices so rich they’ll have everyone asking for seconds. The bark is crisp enough to satisfy crunch lovers, while the meat inside remains so tender it practically dissolves.
This is the kind of dish that turns a simple weeknight dinner into a showstopper without requiring advanced skills.
Pair these ribs with classic sides like creamy coleslaw, buttery cornbread, or a crisp green salad to balance the richness. The leftovers reheat beautifully too—just wrap them in foil and warm in the oven for 15 minutes.
Let’s get started on creating ribs that will impress even the most critical eaters.
Ingredients for boil and bake ribs
Four pounds of ribs plus a few pantry staples—this is all you need for showstopping ribs.
| Ingredient | Amount | Notes |
|---|---|---|
| Pork Baby Back Ribs 🍖 | 4 lb | Bone-in, meaty ends preferred |
| Water 💧 | 4 cups | Filtered preferred for clarity |
| Kosher Salt 🧂 | ½ cup | Diamond Crystal preferred |
| Granulated Sugar 🍚 | ¼ cup | White or brown works |
| Black Peppercorns 🌶️ | 1 tbsp | Freshly cracked preferred |
| Garlic Cloves 🧄 | 6 cloves | Smashed, not minced |
| Onion 🧅 | 1 whole | Yellow or red, halved |
| Fresh Rosemary 🌿 | 2 sprigs | Or 1 tbsp dried |
| Fresh Thyme 🌿 | 2 sprigs | Or 1 tsp dried |
| Apple Cider Vinegar 🍎 | ¼ cup | For tangy depth |
| Olive Oil 🫒 | 2 tbsp | For baking finish |
| Brown Sugar 🍚 | ½ cup | Packed, for bark |
| Smoked Paprika 🌶️ | 1 tbsp | For color and smokiness |
The ribs are the star, so baby back ribs are ideal—they're meatier than spare ribs and have that perfect balance of fat and lean. Costco or Whole Foods usually have the best quality, but any grocery store's meat counter will have them too. Look for vibrant color and good marbling—no gray or slimy spots. I always buy mine the day I plan to cook them since they're best fresh. If you're using beef short ribs instead, trim any excess fat first—they'll need about 15 extra minutes in the oven.
No fresh rosemary or thyme? Dried works at one-third the amount, but fresh gives that extra punch. Running low on apple cider vinegar? White vinegar or lemon juice works in a pinch, though it'll be slightly less complex. The sugar can be swapped for honey or maple syrup if you prefer, but brown sugar gives that perfect caramelized bark. For the brine, if you're short on water, beef or chicken broth adds extra depth. Just don't skip the garlic and onion—they're the flavor anchors here.
These ribs reheat like a dream—just wrap them in foil and warm at 300°F for 15 minutes. Store leftovers in the fridge for 4 days, or freeze for 3 months wrapped tightly in plastic. The bark gets crispier as they sit, so I always portion them up right away. Pro tip: Let the ribs rest for 10 minutes after baking before cutting—keeps all those juices locked in.
Why You'll Love This Recipe
- Five-Ingredient Magic: I swear, this recipe proves you don’t need a spice rack to win. Just ribs, water, salt, sugar, and peppercorns—boil them once, bake them until caramelized, and boom—fall-apart tenderness with that perfect sticky crust. Honestly, my lazy Sunday mornings just got an upgrade.
- Sweet-Savory Crust: That sugar isn’t just for show—it melts into a glossy, slightly sweet glaze while baking, cutting through the richness of the pork. Between us, the first bite where the crispy edge meets the juicy meat? Chef’s kiss. (Yes, even on a Tuesday night.)
- Weeknight Crowd-Pleaser: I make these for game days, potlucks, or when my college-aged kids show up starving. The prep takes less time than ordering takeout, and the leftovers? They disappear faster than my willpower on a bad day. Plus, it’s the one dish where everyone—even my picky brother—asks for seconds.
- Leftovers That Don’t Suck: Most rib recipes turn into sad, dry scraps by day three. Not these. The meat stays moist, the sauce clings, and I’ve reheated them in the oven or air fryer for days. (Pro tip: Wrap them in foil and freeze half—future-you will thank me.) Budget-friendly? Absolutely. Reliable? Even more so.
Step-by-step instructions for boil and bake ribs
Here's how to transform tough ribs into melt-in-your-mouth perfection with minimal effort.
Prepare the Dry Rub for Maximum Flavor
In a medium bowl, combine the 0.5 cup kosher salt, 0.25 cup granulated sugar, 1 tbsp black peppercorns (freshly cracked), 1 tbsp smoked paprika, and 0.5 cup brown sugar. Mix well with your hands until the sugar and salt break down into fine grains. This dry rub will create that beautiful bark while tenderizing the meat.
Next, add the 2 sprigs fresh rosemary and 2 sprigs fresh thyme, crushing them slightly between your fingers to release their oils. The herbs will infuse deep aromatic flavors into the ribs as they cook. If using dried herbs, reduce to 1 tbsp each—they're more concentrated.
Coat the Ribs and Prep for Boiling
Pat the 4 lb pork baby back ribs completely dry with paper towels—this helps the rub adhere better and promotes even cooking. Generously coat all surfaces with the dry rub mixture, pressing it into the meat so it sticks. Place the ribs in a large pot with a tight-fitting lid.
Add the 4 cups water, 0.25 cup apple cider vinegar, 6 smashed garlic cloves, and the halved onion to the pot. The vinegar adds tangy depth while the garlic and onion contribute sweet, savory notes. Bring everything to a boil over high heat, then immediately reduce to a gentle simmer. Cover and cook for 2 hours, letting the ribs steam in their own juices.
Bake to Crispy Perfection
Preheat your oven to 375°F. After the boiling phase, carefully transfer the ribs to a baking sheet lined with aluminum foil. Drizzle them with 2 tbsp olive oil and spread it evenly over the meat. The oil helps create that coveted crispy bark during baking.
Bake uncovered for 45-60 minutes until the ribs reach an internal temperature of 195-203°F at their thickest point. You'll know they're ready when they pull apart easily with two forks and the edges are deep mahogany brown. The high heat finishes the cooking while developing that irresistible crust.
Rest and Serve with Confidence
Remove the ribs from the oven and let them rest on a cutting board for 10-15 minutes before serving. This resting period allows the juices to redistribute throughout the meat, ensuring each bite is moist and flavorful. The ribs should be so tender they practically fall off the bone.
Slice between the bones to serve, arranging the meaty portions on a platter. Garnish with extra fresh thyme sprigs if desired. Serve with classic barbecue sides like coleslaw or cornbread to soak up all that delicious rib juice. These ribs deliver on that "fall-off-the-bone" promise every time.
Pro Tips For Making Boil And Bake Ribs
- Trim the Fat First: I learned this the hard way—skipping this step means your ribs will steam instead of caramelize. Use kitchen shears to snip the silver skin off the bones and trim any thick fat caps; it’s tedious but worth it for crispier edges and better sauce absorption.
- Boil with Precision: Don’t just dump everything in and walk away. Bring the water to a full, rolling boil first, then add the ribs—this ensures they cook evenly from the start. After 30 minutes, reduce to a gentle simmer (tiny bubbles, not steam clouds), or you’ll end up with tough, waterlogged meat.
- Salt the Water Hard: More salt than you’d think—about ½ cup kosher salt per gallon of water. This isn’t just for flavor; it seasons the meat from the inside out and helps the sugar in the dry rub stick later. (Yes, even if you’re impatient like me.)
- Bake Uncovered After 2 Hours: The last hour is where the magic happens—skip the foil. The ribs need that direct oven heat to crisp up, not just steam. If they’re not golden by 325°F, crank it to 375°F for the final 15 minutes. (Your future self will thank you.)
Essential equipment for perfect results
Boiling Pot Essentials
The right pot makes all the difference. I use a 6-quart enameled cast iron Dutch oven—like Le Creuset or Lodge—because it distributes heat evenly and handles the boiling phase perfectly. The tight-fitting lid traps steam, which tenderizes the ribs faster.
If you don’t have a Dutch oven, a heavy stainless steel pot with a lid works too, but avoid thin aluminum—it can’t maintain a steady temperature. 💧
Baking Sheet Must-Haves
For the baking phase, I recommend a half-sheet pan (18x13 inches) lined with heavy-duty aluminum foil. The foil prevents sticking and makes cleanup a breeze. If your pan isn’t large enough, use a rimmed baking sheet—just make sure the ribs aren’t crowded.
Crowding leads to uneven cooking and a soggy bark. A wire cooling rack placed over the pan during the last 10 minutes of baking helps crisp the underside.
Temperature Tools
Never guess the doneness of ribs—always use a meat thermometer. I swear by the ThermoWorks Smoke or Thermoworks Dot for accuracy. Insert the probe into the thickest part of the meat (avoiding bone) to check for 195-203°F.
A laser thermometer like Meater is great for quick reads without piercing the meat. Without a thermometer, you risk overcooking or undercooking—neither is ideal for fall-off-the-bone perfection. 🌡️
Oven Thermometer
Your oven’s temperature display isn’t always accurate. I use a Thermopro TP16 oven thermometer to confirm it’s hitting 375°F before baking. Ovens often run 25-50°F hotter or cooler than set, and ribs need precise heat to develop that perfect bark.
If your oven runs hot, reduce the temperature to 350°F to avoid burning the exterior before the meat is tender.
Tongs and Tools
Long-handled tongs (like OXO Good Grips) are essential for flipping ribs in the boiling pot and transferring them to the baking sheet. A silicon spatula helps with any stubborn bits. For serving, a sharp carving knife (like Victorinox 8-inch) makes slicing between the bones effortless.
Avoid dull knives—they crush the meat instead of cleanly separating it. A basin for drippings (like Staub gratin dish) catches all the delicious juices for basting or sauces.
Optional Upgrades
For next-level results, consider a meat injection kit (like Meater Injector) to inject ribs with a 50/50 mix of beef broth and apple cider vinegar before boiling. This adds moisture and flavor deep into the meat.
A spray bottle with water helps keep the bark crisp during baking by lightly misting the ribs in the last 5 minutes. Finally, a digital timer (like KitchenAid) ensures you don’t overcook the ribs while you’re distracted. 💡
Nutrition facts
Frequently asked questions
Can I use beef short ribs instead of pork baby backs?
Yes, but you'll need to adjust the cooking time. Beef short ribs are tougher and require about 15 extra minutes in the boiling phase and 30 extra minutes in the oven. Trim excess fat first to prevent grease fires. The internal temperature should still reach 195-203°F for perfect tenderness.
Why do my ribs turn out dry even after boiling?
Overcooking in the oven is the most common cause. Always check the internal temperature with a meat thermometer—203°F is the upper limit. Also, let the ribs rest for 10-15 minutes after baking to redistribute juices. If they're still dry, try reducing the oven temperature to 350°F and adding 10 more minutes to the baking time.
Do I need to remove the membrane from the ribs?
Yes, this thin membrane on the bone side can prevent proper seasoning and tenderness. Slide a butter knife or spoon under it to loosen, then pull it off—it should come away easily. This step is especially important for baby back ribs.
Can I make this recipe in a slow cooker?
Not exactly, but you can adapt it! After the boiling phase, transfer the ribs to a slow cooker on Low for 4-5 hours instead of baking. The texture will be more tender than crispy, but still delicious. For extra bark, broil for 5 minutes at the end. The slow cooker method works best with beef short ribs.
What's the best way to reheat leftover ribs?
Wrap ribs tightly in foil and reheat at 300°F for 15 minutes—this keeps them moist. For extra crispiness, broil for 2-3 minutes at the end. Never microwave as it makes the meat tough. Leftovers stay good for 4 days in the fridge or 3 months in the freezer.