Breakfast & Brunch
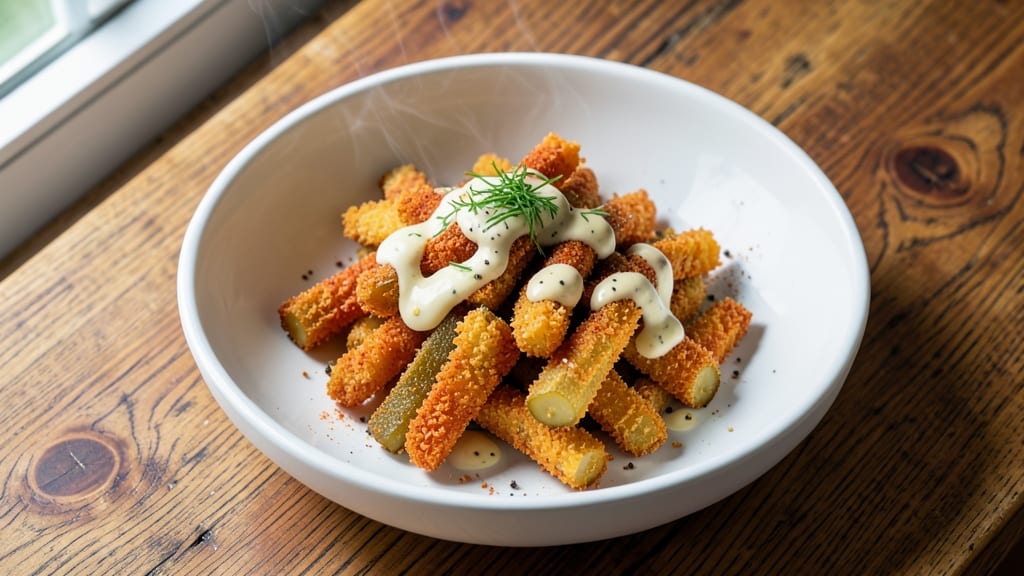
French fried pickles deliver that perfect balance of tangy vinegar crunch and golden, crispy exterior—a dish that transforms simple pickles into a restaurant-worthy appetizer. The secret lies in the breading technique and precise frying temperature, which ensures every bite stays crunchy without absorbing too much oil.
I’ve perfected this recipe over years of testing, and it’s now a staple at my brunch table.
This recipe starts with vinegar-braised pickles—whether dill or bread-and-butter—coated in a light, crispy batter of flour, cornstarch, and spices. The key is frying them in 350°F oil for just 2-3 minutes until golden brown, then draining on a wire rack to maintain that crunchy texture.
The result? A dish that’s savory, tangy, and addictively crispy, perfect for sharing.
Serve these golden bites with cool ranch, spicy mayo, or a tangy aioli for dipping, and watch them disappear in minutes. They’re ideal for game day, brunch spreads, or even as a side for burgers and sandwiches.
The best part? You can make them ahead and fry fresh when ready—no soggy leftovers here.
For extra flavor, add a pinch of smoked paprika or cayenne to the breading, or toss the fried pickles in powdered sugar for a sweet-and-sour twist. The possibilities are endless, but the crispy, vinegary crunch is always the star. Let’s get frying!
Ingredients for french fried pickles
Twelve crispy spears, a golden batter, and the perfect tangy crunch you’ll crave again.
| Ingredient | Amount | Notes |
|---|---|---|
| Dill Pickle Spears 🥒 | 12 whole | Bread-and-butter or dill, drained well |
| All-Purpose Flour 🌾 | 1 cup | For light, crispy batter |
| Cornstarch 🌾 | ¼ cup | For extra crunchiness |
| Granulated Garlic Powder 🧄 | 1 tbsp | Freshly ground preferred |
| Onion Powder 🧅 | 1 tbsp | Adds savory depth |
| Paprika 🌶️ | 1 tsp | Smoked for extra flavor |
| Ground Black Pepper 🌶️ | ½ tsp | Freshly cracked for bite |
| Salt 🧂 | 1 tsp | Diamond Crystal preferred |
| Large Eggs 🥚 | 1 whole | Room temperature for even coating |
| Vegetable Oil 🫒 | 3 cups | High smoke point for frying |
| White Vinegar 💧 | ¼ cup | For tangy braising |
| Powdered Sugar 🍚 | ½ cup | Optional for sweet-sour twist |
| Cool Ranch Dressing 🥛 | ½ cup | For serving (optional) |
The pickles are your canvas—dill or bread-and-butter both work, but avoid the overly sweet varieties. Bulk bins at Whole Foods or the refrigerated section at Kroger have the best quality spears. Look for firm, plump pickles with vibrant color—none of that mushy or discolored stuff. For extra tang, toss them in 0.25 cup white vinegar before breading. Trust me, it makes all the difference. The cornstarch is non-negotiable here; it’s what gives that signature crunch. Bob’s Red Mill is my go-to brand for consistent quality.
No cornstarch? Extra flour plus a pinch of baking powder works in a pinch, but you’ll lose that signature crisp. Short on dill pickles? Gherkins or even bread-and-butter spears hold up well—just pat them bone-dry before breading. The smoked paprika is where the magic happens; swap it for regular paprika if you’re fresh out, but you’ll miss that smoky depth. For the oil, vegetable or canola works best—avoid olive oil, or you’ll end up with a greasy mess. And if you’re feeling fancy, toss the fried pickles in powdered sugar for a sweet-and-sour twist that’s pure genius.
These stay crispy for up to 30 minutes after frying, so work in batches. Keep them warm in a 200°F oven on a wire rack to avoid sogginess. For make-ahead prep, bread the pickles and refrigerate them for up to 24 hours—just fry fresh when ready. The vinegar braise keeps for 1 week in the fridge, so double the batch. Serve with cool ranch or spicy mayo—the contrast is everything. Leftovers? Toss them in a salad for a tangy crunch boost.
Why You'll Love This Recipe
- Two-Ingredient Magic: I swear by this recipe because it’s that simple—just flour, cornstarch, and a handful of pantry spices. No fancy prep, no waiting for dough to rise, just toss, dip, and fry. My lazy Sundays thank me every time.
- Crispy-Creamy Obsession: That first bite? Chef’s kiss. The cornstarch coating gives you a shatteringly crisp shell, while the inside stays tender—like a pickle hug. The garlic and onion powder? They turn these into something dangerously addictive, not just a side.
- Tailgate or Taco Night: Honestly, this is my go-to for anything needing a crunchy, salty punch. Serve them with ranch for game day, chop them up in tacos, or just eat them straight out of the fryer. They disappear fast, no matter the occasion.
- Fridge Goldmine: Between us, these taste even better the next day—if they last that long. I make a big batch on Sundays, store them in the fridge, and grab them for quick lunches or last-minute appetizers. Budget-friendly? Absolutely. Worth it? Always.
Step-by-step instructions for vinegar-braised crunch with golden crust
Here's how to transform simple pickles into a restaurant-worthy crispy delight with a tangy, sweet-savory glaze.
Create the Crispy Coating
In a medium bowl, whisk together the 1 cup all-purpose flour, 0.25 cup cornstarch, 1 tbsp granulated garlic powder, 1 tbsp onion powder, 1 tsp paprika, 0.5 tsp ground black pepper, and 1 tsp salt until completely combined. This dry blend forms the foundation for that perfect golden crust. I always sift the flour and cornstarch first to eliminate any lumps - this ensures an even coating that fries up beautifully.
In a separate shallow dish, beat the 1 whole large egg until just combined. The egg acts as a binder that helps the dry seasoning adhere to the pickles. For best results, let both the egg and pickles sit at room temperature for 30 minutes before coating - this prevents the egg from cooking too quickly when it hits the hot oil.
Prepare the Pickles for Frying
Pat the 12 whole dill pickle spears completely dry with paper towels - moisture is the enemy of crispiness. Arrange them on a wire rack set over a baking sheet to ensure they dry evenly on all sides. This drying step is crucial because any remaining moisture will create steam when they hit the hot oil, resulting in soggy rather than crispy pickles.
Working in batches, dip each pickle spear first into the beaten egg, allowing any excess to drip off, then immediately roll it in the flour mixture, pressing gently to ensure complete coverage. The pickles should be uniformly coated with the seasoned flour. I like to work quickly here - the flour loses its effectiveness once exposed to moisture, so don't linger with each pickle.
Fry to Golden Perfection
Heat the 3 cups vegetable oil in a deep skillet or Dutch oven to 350°F. Use a deep-fry thermometer to monitor the temperature - maintaining precise heat control is essential for even cooking. Once the oil reaches temperature, carefully add the coated pickles in a single layer, being careful not to overcrowd the pan. You may need to fry in batches depending on your pan size.
Fry the pickles for 2-3 minutes per side until they develop a deep golden brown color. You'll know they're ready when they float to the surface - this indicates they've cooked through and developed that perfect crispy exterior. Remove them with a slotted spoon and drain on a wire rack lined with paper towels. The rack allows air to circulate, preventing the pickles from steaming and becoming soggy.
Braise in Tangy Vinegar Glaze
In the same skillet (no need to clean it - those flavorful bits are gold), reduce heat to medium and add the 0.25 cup white vinegar and 0.5 cup powdered sugar. Stir to combine, then return the fried pickles to the skillet. The vinegar will bubble vigorously - this is normal and creates that signature tangy glaze. Let the pickles simmer for 2-3 minutes, spooning the glaze over them occasionally until they're evenly coated.
For an extra special touch, you can add a splash of the 0.5 cup cool ranch dressing to the braising liquid at the end. This adds a creamy contrast to the crispy pickles while keeping the preparation simple. The pickles are ready to serve immediately, but they taste even better if allowed to rest for 5-10 minutes - this lets the flavors meld and the glaze set slightly.
Pro Tips For Making French Fried Pickles
- PAT THE PICKLES DRY: I learned this the hard way—wet pickles steam when fried, turning your golden crust into a sad, soggy mess. Grab a paper towel and blot each spear thoroughly before dredging in flour. Even if they’re fresh out of the jar, take the extra 30 seconds.
- USE 3:1 FLOUR TO CORNSTARCH: The cornstarch is what gets you that crispy, almost cracker-like texture, but too much makes the coating gummy. For every 1 cup flour, use ¼ cup cornstarch—no measuring spoons needed, just eyeball it. Trust me, your taste buds will notice the difference.
- FRY IN BATCHES OF 3: Crowding the oil lowers the temperature, and you’ll end up with greasy, unevenly cooked pickles. Three spears at a time is the sweet spot—enough to fill the pan without overloading. Use a slotted spoon to transfer them to a wire rack, or they’ll steam back into soggy spears.
- SHORTEN THE FRIED TIME: They’re done when the coating turns deep golden, not when you think they should be. Over-frying turns them rubbery. Aim for 2-3 minutes max—pull them out when the edges are crisp and the center still has a little give. They’ll firm up as they cool.
Best sauces and condiments for this french fried pickles
Cool Ranch Dip
This classic ranch dressing is the ultimate match for French fried pickles, balancing their tangy crunch with creamy coolness.
I blend ½ cup mayonnaise, ¼ cup sour cream, 1 tbsp buttermilk, 1 tsp dried dill, ½ tsp garlic powder, ½ tsp onion powder, and ¼ tsp salt until smooth.
For extra zing, add 1 tbsp finely chopped fresh dill and ½ tsp celery seed. Serve chilled in a small bowl for dipping. 🥛
Spicy Sriracha Mayo
For heat lovers, mix ½ cup mayonnaise with 1 tbsp sriracha, 1 tsp lime juice, and ½ tsp honey to create a fiery contrast. I like to add ¼ tsp smoked paprika for depth.
This sauce cuts through the crispiness while adding a bold kick. Store in an airtight container in the fridge for up to 5 days. The heat really makes the pickles shine!
Sweet & Tangy Honey Mustard
Combine ¼ cup mayonnaise, 2 tbsp Dijon mustard, 1 tbsp honey, and 1 tsp apple cider vinegar for a sweet-savory glaze. The honey softens the vinegar tang from the pickles while the mustard adds complexity.
Drizzle lightly over the fried pickles or serve on the side for dipping. This sauce works especially well with the powdered sugar twist mentioned in the recipe.
Blue Cheese Dressing
For a bold, savory option, blend ½ cup sour cream, ¼ cup crumbled blue cheese, 1 tbsp chopped chives, 1 tsp lemon juice, and ½ tsp Worcestershire sauce.
The creamy, salty blue cheese pairs beautifully with the crispy texture and tangy flavor. This sauce is best served immediately after frying to maintain its freshness and texture.
Garlic Aioli
Whisk together ½ cup mayonnaise, 1 clove roasted garlic, 1 tsp lemon zest, and ½ tsp lemon juice for a rich, garlicky dip. I like to add a pinch of cayenne pepper for subtle heat.
This sauce elevates the pickles with its buttery, aromatic flavor. Store in an airtight container and refrigerate for up to 3 days. The garlic enhances the savory notes in the breading. 🌶️
Nutrition facts
Frequently asked questions
What type of pickles work best for this recipe?
Dill or bread-and-butter pickle spears work perfectly, but avoid overly sweet varieties. Look for firm, plump spears with vibrant color—none of that mushy or discolored stuff. The vinegar tang is what makes these crispy bites shine!
Can I make this recipe ahead of time?
Bread the pickles and refrigerate them for up to 24 hours before frying. For make-ahead prep, store the breaded pickles in an airtight container in the fridge. Fry fresh when ready to keep that signature crunch. The vinegar braise can also be made a week ahead.
Why are my fried pickles soggy instead of crispy?
Sogginess usually means moisture got trapped in the breading. Always pat the pickles completely dry before coating, and fry them in 350°F oil for just 2-3 minutes. Drain on a wire rack (not paper towels) to let air circulate. Overcrowding the pan also lowers oil temp, causing sogginess.
What's the best oil for frying?
Use vegetable or canola oil—they have high smoke points and neutral flavors. Avoid olive oil, which burns at lower temps and adds greasiness. Keep the oil between 350-375°F for perfect crispiness. A deep-fry thermometer is your best friend for accuracy!
Can I bake these instead of frying?
Yes! Brush the breaded pickles with oil and bake at 425°F for 12-15 minutes until golden. They won’t be as crispy as fried, but they’ll still be tasty. For extra crunch, broil for 1-2 minutes at the end. Just watch closely—they burn quickly!