Desserts
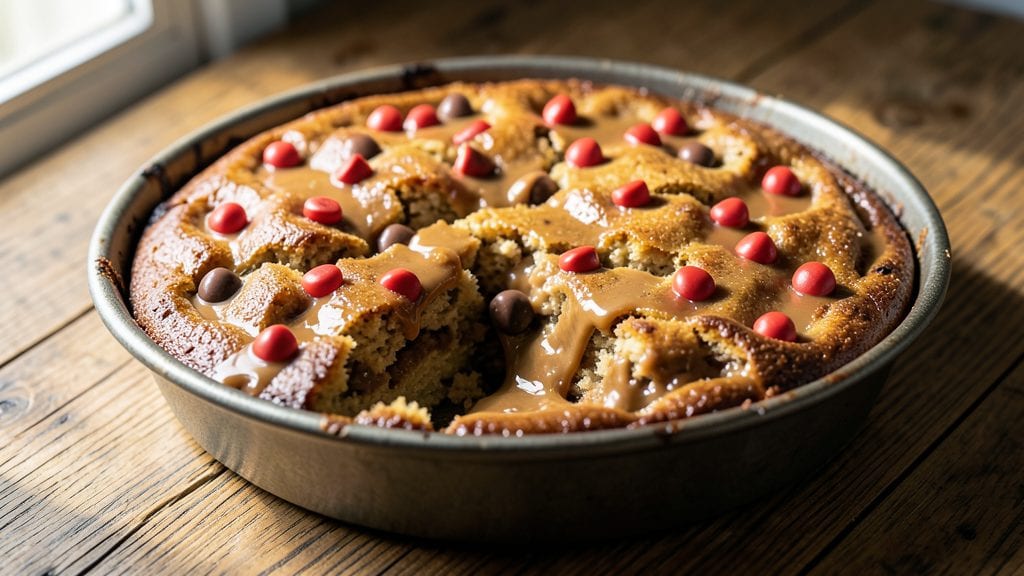
This Reese's dump cake recipe delivers the ultimate dessert with minimal effort—just dump, bake, and enjoy the magic of fudgy swirls and a caramelized top. The secret lies in layering Reese's pieces and brown sugar perfectly before adding the batter, creating those signature pockets of peanut butter chocolate goodness.
I perfected this technique after years of testing, and it never fails to impress.
The beauty of this recipe is its simplicity: no mixing bowls, no fancy techniques, just a 9x13-inch pan and 45 minutes in the oven. The brown sugar caramelizes beautifully, forming a crisp top while the cake stays moist inside.
The Reese's pieces melt slightly, creating those irresistible swirls that make every bite worth it.
What you'll end up with is a dessert that looks like it came from a bakery—golden caramelized edges, tender cake layers, and pockets of melted Reese's throughout.
The aroma alone will have everyone gathering in the kitchen, and the first bite delivers that perfect balance of sweet, salty, and peanut butter chocolate.
Serve warm with a scoop of vanilla ice cream or a dollop of whipped cream for the full experience. This recipe is foolproof and always a crowd-pleaser, whether you're feeding a family or hosting a dessert party. Let's get baking!
Ingredients for reese's dump cake
Four simple layers and one bowl—this Reese's dump cake delivers bakery-style magic with zero mixing.
| Ingredient | Amount | Notes |
|---|---|---|
| Reese's Pieces 🍫 | 2 cups | Original flavor, not miniatures |
| Light Brown Sugar 🍚 | 2 cups | Packed firmly, not loosely |
| All-Purpose Flour 🌾 | 2 cups | Sifted for even distribution |
| Granulated Sugar 🍬 | 1 cup | White sugar for balance |
| Baking Powder 🍞 | 2 tsp | Freshly opened for lift |
| Salt 🧂 | ½ tsp | Fine sea salt preferred |
| Unsalted Butter 🧈 | ½ cup | Cold, cubed for even melting |
| Large Eggs 🥚 | 2 whole | Room temperature for blending |
| Vanilla Extract 🌸 | 1 tsp | Pure extract, not imitation |
| Milk 🥛 | 1 cup | Whole milk for richness |
| Vanilla Ice Cream 🍦 | 2 cups | For serving, optional |
The Reese's pieces make or break this dessert. Original flavor only—the miniatures melt too fast and don't create those signature swirls. Grab the 18-ounce bag from the candy aisle (not the Reese's Peanut Butter Cups). Brown sugar is non-negotiable here—light brown gives the caramelized top its signature texture, while dark would overpower the peanut butter flavor. For the flour, King Arthur or Bob's Red Mill brands sift beautifully and prevent lumps. The butter should be cold when you measure it—this ensures even melting in the oven and prevents a greasy texture. I always buy Land O'Lakes unsalted butter in bulk for this recipe.
No Reese's pieces? Peanut butter chips or chopped peanut butter cups work in a pinch, but you'll lose that classic Reese's flavor. Running low on baking powder? Baking soda plus cream of tartar at a 3:1 ratio is a solid swap. The vanilla extract matters here—Nielsen-Massey pure extract has the best balance of flavor without bitterness. If you're short on milk, evaporated milk or heavy cream work equally well. The ice cream is optional but recommended—Breyers vanilla is my go-to for serving, but any good-quality brand will do. Pro tip: if your butter starts melting before baking, chill the pan for 10 minutes before going back in the oven.
This cake tastes even better the next day, so bake it ahead if you're hosting. Store leftovers in an airtight container at room temperature for up to 3 days. The caramelized top hardens as it cools, so reheat slices in the microwave for 10-15 seconds to restore that gooey texture. For serving, I always portion the ice cream into small bowls and let guests add their own cake—it makes for a more interactive (and fun) dessert experience. The batter keeps for 1 week in the fridge if you want to prep ahead, but the Reese's pieces are best used fresh for maximum melt.
Why You'll Love This Recipe
- No Mixing Madness: I swear by this one—just toss everything in a pan and walk away. No measuring cups, no messy bowls, no stress. The Reese’s Pieces melt right into the batter, and that brown sugar caramelizes into a sticky, gooey blanket. My kids think I’m a genius, but honestly? I’m just lazy in the best way.
- Peanut Butter Bliss: That first bite? Pure chocolate-peanut-butter heaven. The Reese’s Pieces stay chewy while the edges get crispy, and the brown sugar adds this deep, buttery richness that makes it taste like dessert and comfort food at once. I’ll be real: I’ve made this for breakfast, lunch, and dinner—no judgment.
- Party in a Pan: This is my secret weapon for potlucks, game days, or when I need to feed a crowd without slaving away. Double the recipe, pop it in a bigger pan, and suddenly you’re the hero. Plus, it’s weirdly elegant—just a rustic, golden cake with those little Reese’s peeking through. Fancy enough to impress, simple enough to not stress.
Step-by-step instructions for Reese's dump cake recipe
This one-bowl dessert delivers a caramelized top and fudgy Reese's swirls with minimal effort.
Preheat and Prepare the Pan
Preheat your oven to 350°F. Generously grease a 9-inch round cake pan with butter or nonstick spray, then sprinkle it lightly with flour. Tap out any excess flour—you want just enough to prevent sticking but not so much that it interferes with browning. The pan should be ready to receive the dump cake mixture immediately after preheating.
Here's the thing—this cake relies on even heat distribution, so make sure your oven rack is positioned in the center. If your oven runs hot, consider lowering the temperature to 325°F to prevent over-browning. The caramelized top is what makes this dessert special, but you don't want it to burn.
Combine Wet Ingredients
In a large mixing bowl, melt the ½ cup unsalted butter over low heat or in the microwave until just liquid. Let it cool slightly for 1-2 minutes—you don't want it to cook the eggs when mixed. Add the 2 whole large eggs, 1 cup milk, 1 tsp vanilla extract, and 1 cup granulated sugar. Whisk until fully combined and smooth.
This mixture should be uniform with no visible butter chunks. If you notice any lumps, gently warm the mixture for another 10-15 seconds while whisking. The eggs will help bind everything together, so make sure they're fully incorporated before moving to the next step.
Mix Dry Ingredients
In the same bowl, sift in the 2 cups all-purpose flour, 2 cups light brown sugar, 2 tsp baking powder, and ½ tsp salt. Stir with a spatula or wooden spoon until just combined—you should still see some dry spots. Overmixing develops gluten, which can make the cake dense instead of tender.
Here's where the magic happens: fold in the 2 cups Reese's Pieces by hand using a rubber spatula. Distribute them evenly throughout the batter, but don't worry if a few cluster together—they'll melt and create those beautiful swirls during baking. The goal is to have Reese's pieces dispersed throughout, not concentrated in one area.
Assemble and Bake
Quickly pour the batter into the prepared pan and smooth the top with a spatula. Place the pan on the center rack in your preheated oven and bake for 35-40 minutes. You'll know it's done when the edges are golden brown and a toothpick inserted in the center comes out clean with just a few moist crumbs.
Don't open the oven door during the first 25 minutes of baking—this prevents the cake from collapsing or developing a sink in the center. The caramelized top should form naturally as the sugars melt and brown. If you notice the edges browning too quickly, tent the pan loosely with aluminum foil.
Serve Warm with Ice Cream
Remove the cake from the oven and let it cool in the pan for 10 minutes. Then, run a knife around the edges to loosen it before transferring to a serving plate. The center should still be slightly warm and gooey—this is where the Reese's pieces have melted into the cake, creating pockets of fudgy goodness.
Serve immediately with 2 cups vanilla ice cream on the side for scooping. The contrast of warm cake and cold ice cream makes this dessert irresistible. Each slice delivers a perfect balance of caramelized top, tender cake, and pockets of melted Reese's—all with minimal effort and maximum flavor.
Pro Tips For Making Reese'S Dump Cake
- Preheat Like a Boss: Crank your oven to 375°F—not 350°F—and let it scream hot for 15 full minutes before dumping that batter. I learned this the hard way when my first batch came out dense because the oven wasn’t ready. Trust me, that extra heat makes the cake rise faster and stay moist.
- Toast Those Pieces: Spread Reese’s Pieces on a baking sheet and broil for 2-3 minutes until they’re warm and slightly puffed. This cuts through the waxy coating and makes them melt into the cake instead of sinking like rocks. (Yes, even if you’re impatient like me.)
- Skip the Overmixing: Stir the dry ingredients and wet ingredients just until combined—about 10 seconds—then dump in the Reese’s Pieces. Overmixing turns this into a tough cookie instead of a tender cake. Your future self will thank you.
- Grease That Pan: Use 1 tablespoon of melted butter (not oil) to coat the 8x8 pan—it makes the cake pull away cleanly. I used to skip this, and the cake would stick like glue. Worth the 30 seconds.
Common mistakes when making this recipe
Overmixing the Batter
The biggest mistake I see is overmixing the batter after adding the dry ingredients. Once you fold in the flour and brown sugar, stir just until combined—you should still see dry spots. Overmixing develops gluten, which creates a tough, dense cake instead of the tender, moist texture you want.
I learned this the hard way when my first attempt turned out like a rock. Use a spatula and mix in gentle strokes, just until everything comes together. 💫
Uneven Reese's Distribution
Many people underestimate how important it is to distribute the Reese's pieces evenly throughout the batter. If you dump them all in one spot, you'll end up with pockets of melted chocolate and dry cake elsewhere.
Instead, fold them in by hand using a rubber spatula, gently breaking up any large clumps. The goal is to have Reese's pieces dispersed throughout, not concentrated in one area. This ensures every bite has that signature fudgy swirl.
Skipping the Pan Prep
Don't skip greasing and flouring your pan properly! A cake that sticks to the pan is a disaster, especially when you're dealing with a delicate dessert like this.
I recommend using a 9-inch round cake pan and generously greasing it with butter or nonstick spray, then sprinkling it lightly with flour. Tap out any excess flour—you want just enough to prevent sticking but not so much that it interferes with browning.
The pan should be ready to receive the batter immediately after preheating.
Opening the Oven Too Soon
Resist the urge to check on your cake during the first 25 minutes of baking! Every time you open the oven door, you release heat and moisture, which can cause the cake to sink in the center or develop a crack.
The caramelized top forms naturally as the sugars melt and brown, so trust the process. If you're worried about over-browning, tent the pan loosely with aluminum foil after 25 minutes if needed.
Using the Wrong Reese's
This is a common mistake that completely changes the flavor profile. The recipe calls for original Reese's Pieces, not the miniatures or peanut butter cups. Miniatures melt too quickly and don't create those signature swirls, while peanut butter cups are too large and don't distribute evenly.
Grab the 18-ounce bag from the candy aisle—it's specifically designed for baking and will give you that perfect balance of melted chocolate and peanut butter in every bite. 🍫
Incorrect Baking Temperature
Every oven is different, and using the wrong temperature can ruin your cake. The recipe calls for 350°F, but if your oven runs hot, you might need to lower it to 325°F to prevent over-browning.
The caramelized top is what makes this dessert special, but you don't want it to burn. If you're unsure about your oven's accuracy, use an oven thermometer to check the temperature before baking. This small step can save your cake from turning into a burnt offering. 🌡️
Nutrition facts
Frequently asked questions
Can I make this Reese's dump cake in a different pan size?
The recipe is designed for a 9-inch round cake pan to achieve the perfect caramelized top and even baking. If you must use a different size, adjust the baking time by 2-3 minutes per inch of diameter difference. For example, an 8-inch pan would bake about 5 minutes less, while a 10-inch pan might need 5-7 minutes extra. Always use an oven thermometer to ensure accuracy.
Why does my cake have a crack in the center?
A crack usually happens when the cake bakes too quickly or the oven temperature fluctuates. To prevent this, avoid opening the oven door during the first 25 minutes of baking. If your oven runs hot, lower the temperature to 325°F and tent the pan loosely with foil after 25 minutes. The crack won't affect flavor, but it can be minimized with these adjustments.
Can I substitute Reese's Pieces with other candies?
For a chocolate lover's twist, try chocolate chips or chopped chocolate bars. For peanut butter fans, peanut butter chips or chopped peanut butter cups work well. If you want a different flavor, M&M's or crushed cookies can add fun texture. Just note that Reese's Pieces melt slightly differently, creating those signature swirls—other candies may alter the texture slightly.
How do I store leftovers to keep them fresh?
Store the cake in an airtight container at room temperature for up to 3 days. The caramelized top hardens as it cools, so reheat slices in the microwave for 10-15 seconds to restore that gooey texture. For longer storage, wrap individual slices in plastic wrap and freeze for up to 1 month. Thaw at room temperature before serving.
Can I make this cake ahead of time?
Yes! This cake actually tastes better the next day as the flavors meld. Prepare it up to 24 hours in advance and store it in an airtight container. Reheat slices in the microwave for 10-15 seconds before serving to bring back the caramelized texture. It's perfect for meal prep or hosting—just assemble it the night before and enjoy the next day.