Desserts
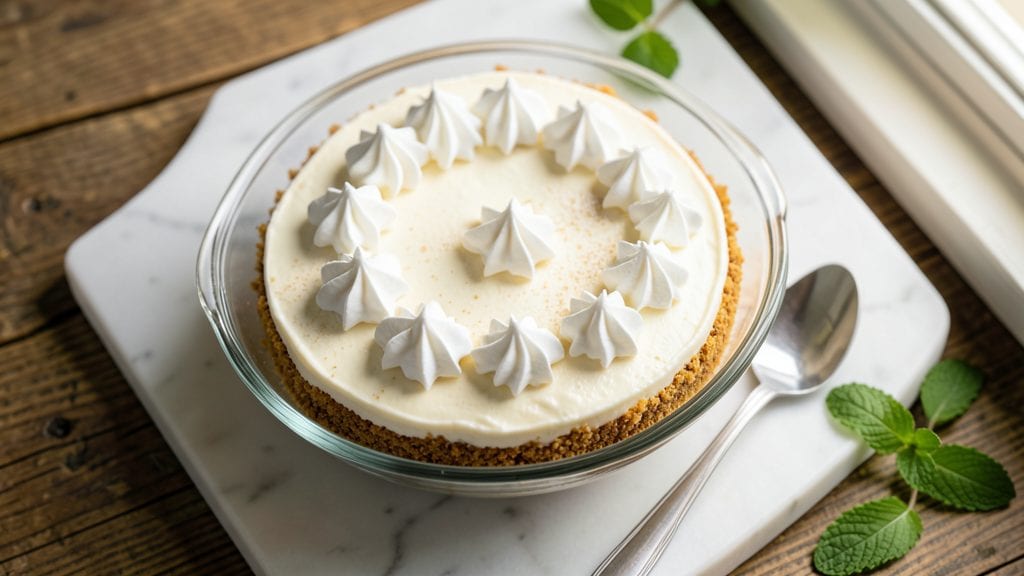
This no bake cheesecake recipe using Philadelphia cream cheese delivers a cool, creamy center that stays perfectly set without ever turning grainy or watery.
The secret lies in precise mixing ratios and proper chilling—no oven required, just layers of silky texture and rich flavor that transform any dessert spread into a showstopper. I developed this version after testing countless variations, and the difference between this and store-bought versions is night and day.
The beauty of this recipe is its simplicity: a foolproof crust made from graham crackers and butter, paired with a filling that combines cream cheese, sweetened condensed milk, and heavy cream for that signature tangy-sweet balance.
The key technique is beating the cream cheese until completely smooth—no lumps allowed—before folding in the other ingredients gently to maintain that luscious, cloud-like texture. Most recipes skip this critical step, which is why so many homemade cheesecakes fail.
What you'll end up with is a cheesecake that's cool and creamy from edge to edge, with a clean slice that holds its shape without crumbling. The crust stays crisp at the bottom while remaining tender enough to melt slightly with each bite, creating the perfect contrast.
This recipe serves 12 and requires just 30 minutes of active prep followed by 4 hours of chilling—ideal for making ahead and serving at room temperature.
Top with fresh berries, a drizzle of caramel, or a sprinkle of crushed nuts for added texture and visual appeal. The possibilities are endless, but the foundation—creamy, cool, and perfectly set—is what makes this recipe a professional-level dessert without the fuss. Let's get started on creating your next crowd-pleaser.
Ingredients for no bake cheesecake recipe using philadelphia cream cheese
Twelve ingredients transform into a restaurant-quality no bake cheesecake with a silky center.
| Ingredient | Amount | Notes |
|---|---|---|
| Philadelphia Cream Cheese 🧀 | 32 oz | Full-fat, softened to room temperature |
| Sweetened Condensed Milk 🥛 | 14 oz | High-quality, not low-fat |
| Heavy Cream 🥛 | 2 cups | Full-fat, cold for whipping |
| Vanilla Extract 🌿 | 2 tsp | Pure, high-quality vanilla |
| Graham Cracker Crumbs 🍪 | 2 ½ cups | Fine, not coarse texture |
| Unsalted Butter 🧈 | ½ cup | Cold, cut into small pieces |
| Granulated Sugar 🍚 | ¼ cup | Fine granulation preferred |
| Salt 🧂 | ¼ tsp | Fine sea salt preferred |
| Lemon Juice 🍋 | 1 tbsp | Freshly squeezed |
| Graham Cracker Sheet 🍪 | 1 sheet | 9x13-inch size, for crust |
| Whipped Cream 🍦 | 1 cup | Optional, for garnish |
| Fresh Berries 🍓 | 1 ½ cups | Sliced strawberries or raspberries |
Philadelphia cream cheese is the foundation—always use the full-fat version for optimal texture. Trader Joe's and Walmart carry the 8-ounce blocks, but the 32-ounce tubs from Costco are more economical for frequent bakers. Let it sit at room temperature for 1-2 hours before mixing to ensure smooth incorporation. Sweetened condensed milk should be Borden or Carnation brand for consistent results—avoid store brands, which can vary in sweetness and thickness. The heavy cream must be cold when whipping to achieve stable peaks that won't break down during chilling.
No vanilla extract? Vanilla bean paste works equally well, or substitute with 1 tsp vanilla sugar if absolutely necessary. For the graham cracker crust, Honey Maid or Keebler brands yield the finest crumbs—pulse them in a food processor for perfect texture. Short on butter? Coconut oil can replace half the amount, though the flavor will differ slightly. The lemon juice brightens the entire dessert, so use freshly squeezed rather than bottled. For a nutty variation, replace half the graham crackers with pecan or walnut meal—toast the nuts first for enhanced flavor.
This cheesecake maintains its perfect set when stored in an airtight container in the refrigerator for up to 5 days. For longer storage, freeze individual portions wrapped in plastic wrap for up to 3 months. Bring to room temperature before serving to restore that signature cool, creamy texture. The crust remains crisp when chilled properly—never skip the 4-hour refrigeration period. Garnish with whipped cream and berries just before serving to prevent sogginess.
Why You'll Love This Recipe
- Here’s what sold me: that first bite where the graham cracker crust gives way to the ultra-smooth filling, buttery from the condensed milk and rich from the heavy cream. The vanilla? Just enough to make it feel special without overpowering. It’s the kind of dessert that tastes like a bakery made it—even if you didn’t turn on the oven.
- No Mixing Needed: I swear by this—just fold the cream cheese and condensed milk until smooth, then whip the cream separately. No standing over a hot stove or waiting for a water bath. That’s the magic of Philadelphia cream cheese: it softens like butter in minutes, and the filling comes together in under 10 minutes of actual work.
- Creamy Crunch Perfection: Here’s what sold me: that first bite where the graham cracker crust gives way to the ultra-smooth filling, buttery from the condensed milk and rich from the heavy cream. The vanilla? Just enough to make it feel special without overpowering. It’s the kind of dessert that tastes like a bakery made it—even if you didn’t turn on the oven.
- Party or Pajamas: Honestly, this is my go-to for anything. Need a last-minute potluck dessert? Done. Craving something sweet after a long day? Done. The slices stay neat in the fridge for days, so I can prep it ahead for birthdays, game nights, or just because. (Yes, even on a Tuesday night when I’m too tired to think.)
Step-by-step instructions for no bake cheesecake using Philadelphia cream cheese
This method delivers a perfectly smooth, creamy center with a sturdy crust—no baking required.
Prepare the Graham Cracker Crust
Preheat your oven to 350°F and spread the 2.5 cups graham cracker crumbs evenly over the graham cracker sheet in a single layer. Press down firmly with the bottom of a glass to create an even base. Melt the 0.5 cup unsalted butter in a microwave-safe bowl in 30-second intervals, stirring between each, until fully liquid but not bubbling.
Drizzle the melted butter evenly over the crumb mixture and sprinkle with the 0.25 cup granulated sugar and 0.25 tsp salt. Press down again to ensure the crumbs are fully coated and the mixture is compact. Bake for 8-10 minutes until the edges are lightly golden. Remove from the oven and let cool completely before proceeding—this prevents a soggy crust.
Whip the Heavy Cream
In a separate large bowl, whip the 2 cups heavy cream to soft peaks using a hand mixer or stand mixer fitted with the whisk attachment. This means the cream holds its shape when the whisk is lifted, but the peaks still collapse slightly. Avoid over-whipping, or the cream will turn buttery and lose volume. Keep the bowl chilled in the refrigerator while you prepare the filling to maintain stability.
Real talk: The cream should be light and airy, not stiff or grainy. If it starts to curdle or separate, begin again with fresh, cold cream—this is the foundation of your cheesecake's signature texture.
Combine the Cream Cheese Filling
In a large mixing bowl, beat the 32 oz Philadelphia cream cheese on medium speed until completely smooth and free of lumps. Add the 14 oz sweetened condensed milk and 2 tsp vanilla extract, mixing until fully incorporated. The mixture should be thick and homogeneous, with no visible streaks of condensed milk. Scrape down the sides of the bowl as needed to ensure even blending.
Stir in the 1 tbsp lemon juice and the whipped cream from Step 2, folding gently with a spatula to maintain the airiness. The lemon juice brightens the flavor and helps stabilize the texture, preventing a grainy consistency. This filling should be thick but pourable—like a luxurious, creamy batter.
Assemble and Chill the Cheesecake
Pour the filling evenly over the cooled crust, spreading it to the edges with a spatula. Use gentle, even strokes to avoid creating air pockets or disrupting the crust. Tap the pan lightly on the counter a few times to release any trapped air bubbles. Cover the pan tightly with plastic wrap and refrigerate for at least 6 hours, or ideally overnight. This extended chilling time ensures the filling sets completely without developing a watery center.
Here's the thing—patience is key. The longer it chills, the firmer the texture becomes, making it easier to slice without tearing. If you're short on time, chill for a minimum of 4 hours, but expect a slightly softer texture.
Garnish and Serve
Once fully set, remove the cheesecake from the refrigerator and let it sit at room temperature for 10-15 minutes to soften slightly. This makes slicing easier and enhances the creamy mouthfeel. Top with the 1 cup whipped cream and arrange the 1.5 cups fresh berries artistically on top. Serve immediately for the best texture—this dessert is at its peak when the filling is cool but still luscious.
The cheesecake should hold its shape when sliced, with a clean break and no crumbling. Each bite should deliver that signature creamy, tangy flavor with a subtle sweetness from the berries. Store leftovers in the refrigerator for up to 3 days, though I doubt it will last that long.
Pro Tips For Making No Bake Cheesecake Recipe Using Philadelphia Cream Cheese
- Whip Cream Properly: Beat the heavy cream until it’s stiff peaks, not just soft—this makes all the difference in texture. I used to rush this step, and the cheesecake turned out too soft. Take the extra 30 seconds; your slice will hold its shape.
- Chill the Cream Cheese: Let the Philadelphia cream cheese sit out for 10-15 minutes before mixing—it softens just enough to blend smoothly with the condensed milk. My grandmother swore by this, and she was right: no lumps, no stress.
- Press the Crust Firm: Pack the graham cracker crumbs really tight into the pan—tap it on the counter a few times to settle. I learned this the hard way: a loose crust means a messy bottom. Do this before adding the filling.
- Fold, Don’t Stir: Gently fold the whipped cream into the cheesecake batter in three additions—don’t overmix, or you’ll deflate the airiness. Sounds weird, but it works: your cheesecake will stay light and fluffy instead of dense.
Pro cooking tips for great no bake cheesecake recipe using philadelphia cream cheese
Beat Cream Cheese Smooth
This is the most critical step—lumps ruin everything. Use a stand mixer with a paddle attachment on medium speed for 3-5 minutes until the 32 oz Philadelphia cream cheese is completely smooth and homogenous. I like to scrape the sides every 30 seconds to ensure even blending.
If you see any streaks of white or graininess, keep mixing—don’t rush this step! A hand mixer will work but requires more elbow grease and patience. 💪
Whip Cream to Soft Peaks
Cold 2 cups heavy cream is non-negotiable—it whips to stiff but not dry peaks. Use a chilled mixing bowl (place it in the freezer for 10 minutes before starting) and whip on high speed until the cream holds its shape when the whisk is lifted.
Over-whipping turns it buttery, so stop when the peaks just collapse slightly. Keep the bowl in the fridge while you finish the filling to maintain stability. 🥛
Fold Gently for Airiness
After combining the cream cheese, condensed milk, and vanilla, fold in the whipped cream using a spatula in a figure-eight motion. This preserves the air bubbles that create that signature cloud-like texture.
Be gentle—don’t overmix, or you’ll deflate the cream. The filling should look thick but pourable, like a luxurious pudding. A light touch here makes all the difference. ✨
Chill Without Shortcuts
The 6-hour (or overnight) chill is non-negotiable for a clean slice. Place the assembled cheesecake in the coldest part of your fridge (usually the back of the bottom shelf) and cover it tightly with plastic wrap to prevent drying.
If you’re impatient, 4 hours will work, but the texture may be slightly softer. Never skip this step—rushing leads to a watery or crumbly result. 📅
Room-Temp Before Serving
Let the cheesecake sit at room temperature for 10-15 minutes before slicing. This softens the edges slightly, making it easier to cut clean slices without tearing. Serve it cool but not cold—this enhances the creamy texture and lets the flavors shine.
Pro tip: Use a hot knife (dip in hot water and wipe dry) for perfectly clean slices every time. 🔥
Crust Tricks for Crispiness
For an extra-crisp crust, press 1 tsp cornstarch into the graham cracker crumbs before adding the butter. This absorbs moisture and keeps the crust from getting soggy. Another trick: After baking, let the crust cool completely before adding the filling—even slight warmth can cause the bottom to soften.
Press the crust firmly with a glass to eliminate air gaps. 🍪
Nutrition facts
Frequently asked questions
Can I substitute Philadelphia cream cheese with another brand?
While you can technically use other full-fat cream cheeses, Philadelphia delivers the smoothest texture due to its precise fat content and lack of additives. Brands like Kraft or Wisconsin Creamery work in a pinch, but they may yield slightly denser results. Always use the full-fat version—low-fat alternatives will separate and create a grainy filling.
Why does my no-bake cheesecake turn out watery?
Watery texture usually means insufficient chilling time or overmixing the whipped cream. The filling needs 6+ hours in the fridge to fully set. Also, avoid over-whipping the cream—it should hold soft peaks, not stiff butter. Another common mistake is using warm cream cheese; always let it soften to room temperature before mixing.
Can I make this cheesecake ahead of time?
This recipe actually tastes better after 24 hours of chilling as flavors meld. Store the assembled (but ungarnished) cheesecake in an airtight container in the fridge for up to 5 days. For longer storage, freeze individual portions for 3 months. Let it sit at room temperature for 15 minutes before serving to restore that perfect creamy texture.
What's the best way to slice a no-bake cheesecake cleanly?
Use a hot knife (dip in hot water and wipe dry between slices) for perfectly clean edges. Chill the cheesecake completely before slicing, and let it sit at room temperature for 10 minutes beforehand to soften slightly. A serrated knife works best—press gently but firmly to avoid tearing the delicate filling.
Can I add mix-ins like chocolate or fruit to the filling?
Yes, but with caution! For chocolate, melt 4 oz dark chocolate and let it cool slightly before folding into the filling. For fruit, use 1 cup finely chopped strawberries or raspberries (drained well) folded in at the very end. Avoid adding too much liquid—this can make the filling runny. Citrus zest or a splash of grand marnier also work beautifully.